Introduction
Welcome to Bankwards!
Your, bank, expense manager & accounting system that's going to make you wonder why ther 3 were ever separated in the first place.
Bankwards is designed specifically for SMEs, providing the tools and insights you need to move your business forward. With Bankwards, business owners don't need a finance background to manage their finances effectively, nor will they need to waste time recording their every financial move just for the sake of compliance.
Whether you're a beginner or an advanced user, this guide will help you get the most out of Bankwards.
Navigating the Interface
Sidebar Navigation Menu
The sidebar navigation menu is your primary tool for accessing the various features and settings within Bankwards. Here’s how to navigate and use the sidebar effectively:
Overview
- Expandable/Collapsible Sidebar: The sidebar can be expanded or collapsed based on your preference. To toggle the sidebar view, click the arrow icon located at the top of the sidebar.
Main Sections
The sidebar is organized into two main sections:
- Primary Pages: The most important pages that you will frequently use.
- Settings: Additional settings that can be expanded or collapsed as needed.
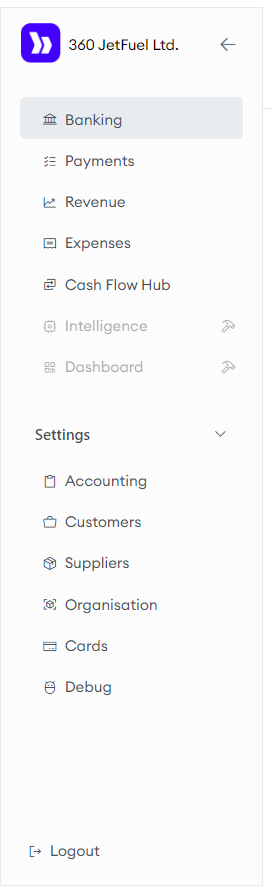
Primary Pages
- Banking: View all your banking accounts and transactions, and categorize them in various ways.
- Payments: Manage and track all your payments as they relate to bills and invoices.
- Revenue: Monitor and analyze your revenue streams.
- Expenses: Record and review your expenses.
- Cash Flow Hub: Review graphical insights into your cash flow and stay on top of upcoming payments.
- Intelligence: The content for this page is being developed and will be published soon.
- Dashboard: The content for this page is being developed and will be published soon.
Settings
- Accounting: Configure the mapping between your bank and your ledger accounts.
- Customers: Access details and information about your customers.
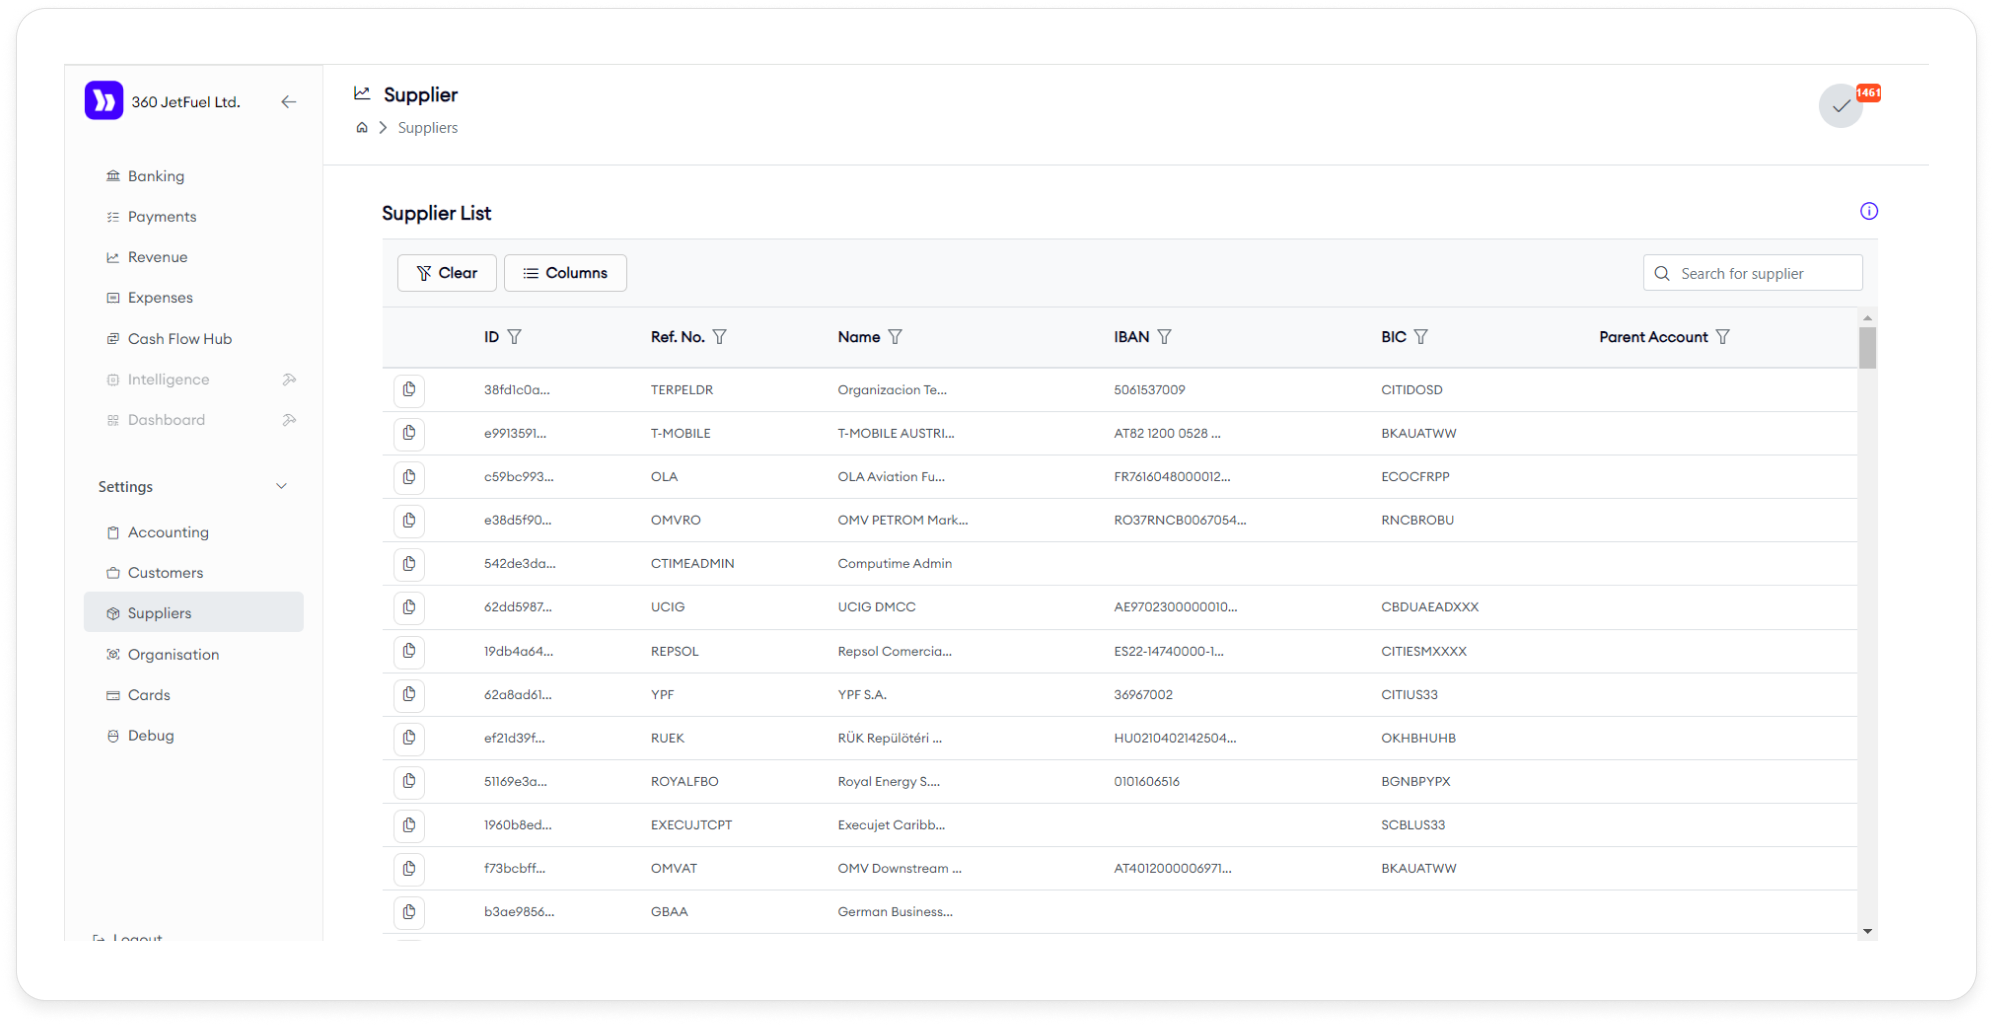
- Suppliers: View and manage information about your suppliers.
- Organisation: Configure and manage your payment settings, including minimum balances you wish to maintain and how agressively you like to settle your obligations.
To expand or collapse the settings section, click the arrow icon next to the Settings heading.
By understanding and customizing the sidebar navigation menu, you can streamline your workflow and make the most out of Bankwards. Continue exploring the user guide to learn more about each feature and how to use them effectively.
Banking
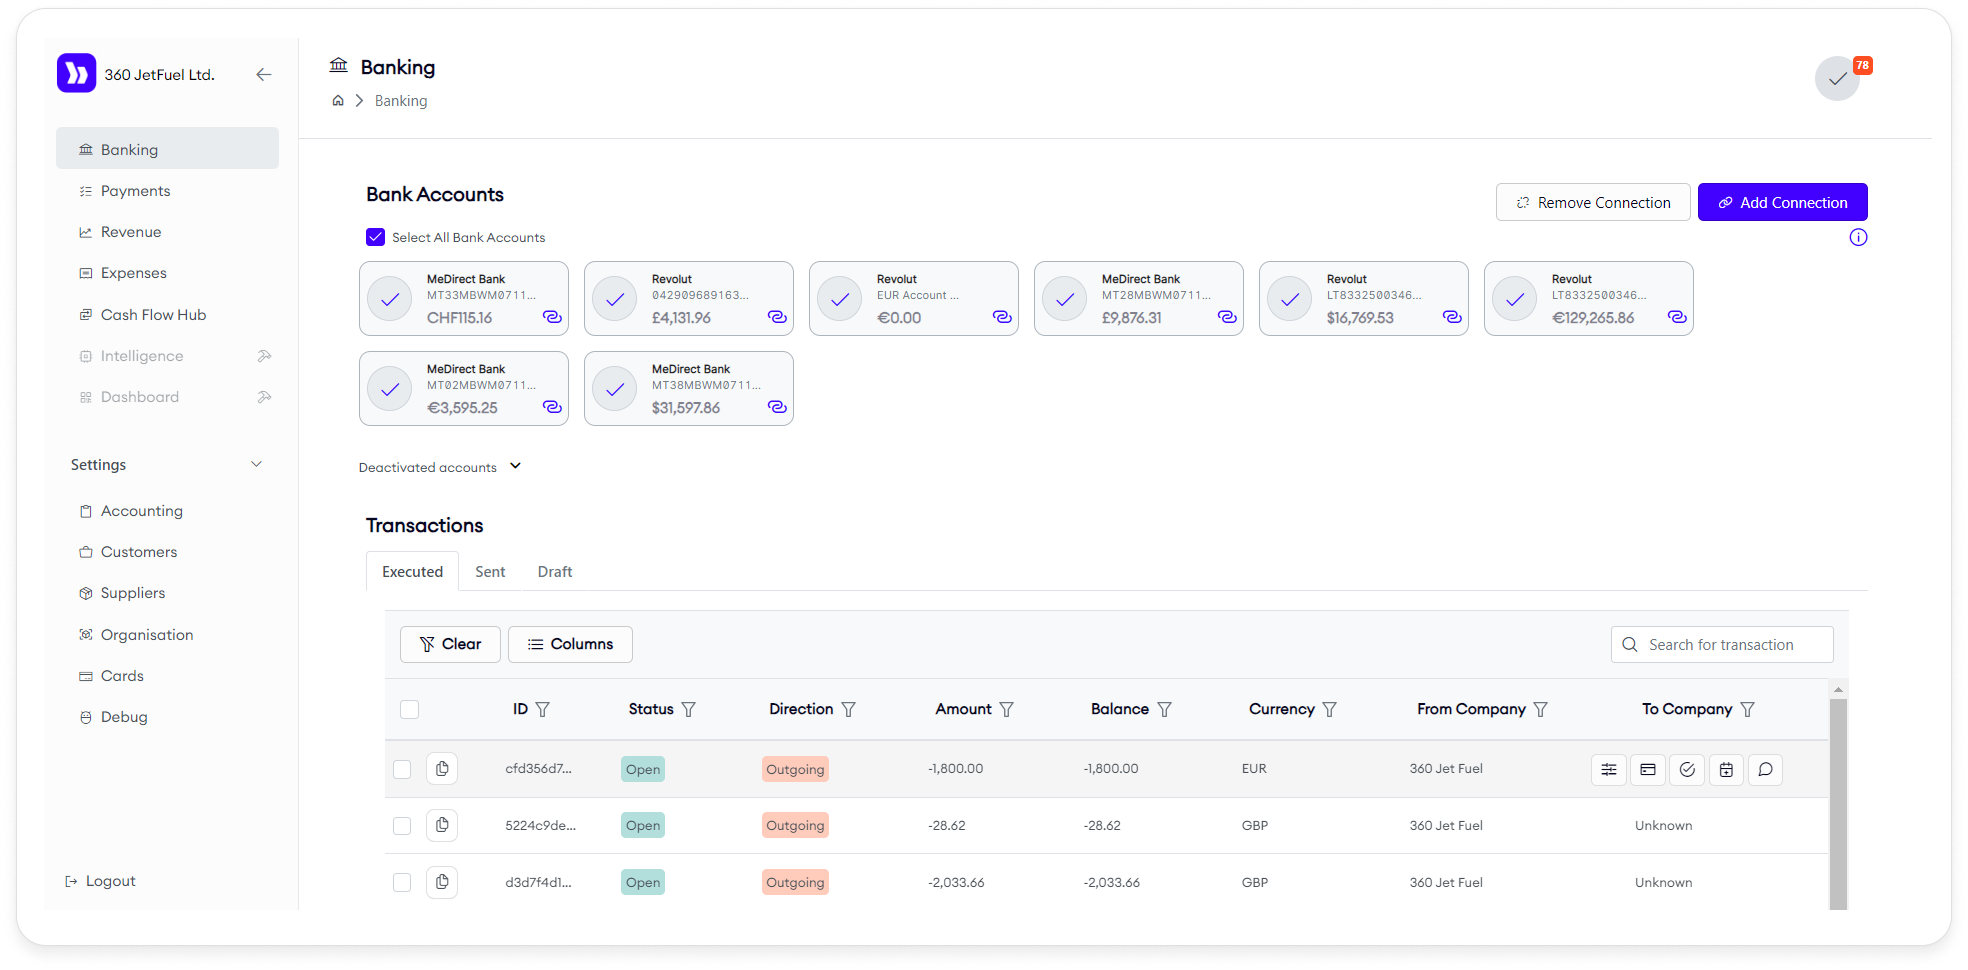
The Banking page allows you to manage and view all your banking accounts and transactions. It is divided into two main sections:
1. Bank Accounts Overview
- Connected Accounts: View and manage all linked bank accounts.
- Add Connection: Click this button to link a new bank account. After linking, the account will appear on this page.
- *Soft Deactivation: Click the link icon in the lower right corner of the bank account to prevent it from being used in the cashflow hub to make payments.
- Remove Connection: To remove a linked account, click this button. The account will be moved to "Deactivated Accounts" but can be reactivated later if needed. This prevents Bankwards from accessing your banking information (until re-connected) and is different from soft deactivating your account.
2. Transactions Section
The transactions section has tabs for three types of transactions: Executed: Transactions that have sucesfully gone through Sent: Transactions that are pending at either the sending, clearing, or receiving bank Draft: Transactions you suggested to you by the cashflow hub you decided you wanted to execute, but never confirmed (due to e.g. accidentaly closing the tab)
- Columns: Add or remove columns as needed.
- Export: Use the export button to export transaction data.
Actions
- Copy ID: Copy a transaction's unique ID by clicking the icon to find it unambiguously anywhere else on the platform.
- Add Comment: Add notes or comments to a transaction.
- Process Transaction: Use the transaction as a payment/prepayment.
- Mark as bank fee: Use this when your bank deducts fees as a separate line item
- Adjust: Use this if your bank deducts fees and sends funds in a single line item, or you want to absorb your counterparty's bank fees
- Mark as misc.: Use this to mark transactions you do not wish to process through bankwards
This page provides a comprehensive view of your financial activity, allowing you to manage accounts and track transactions efficiently.
Payments Page
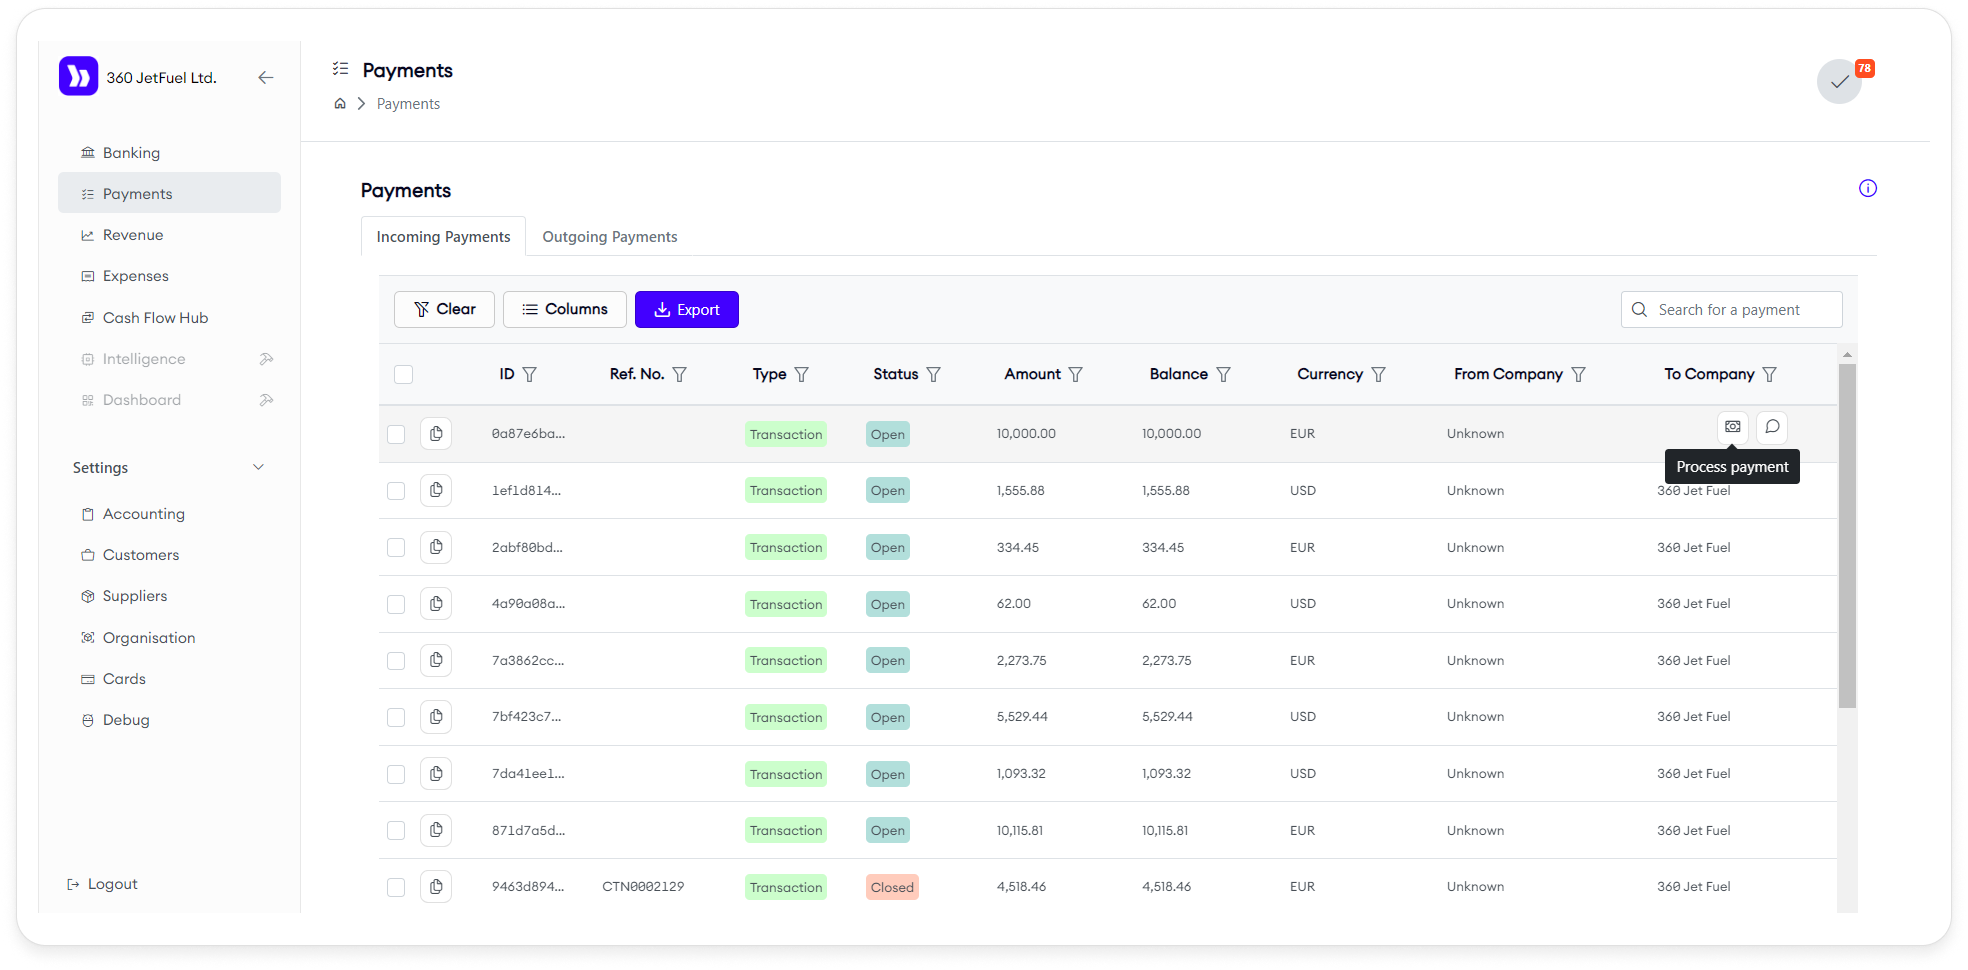
The Payments page is designed to manage and process both incoming and outgoing payments. It features two main tables: Incoming Payments and Outgoing Payments.
Table Features
- Columns: Add or remove columns as needed to customize the view.
- Export: Use the export button to download payment data.
Actions (Applicable to Both Tables)
- Copy ID: Click the icon to duplicate a payment.
- Add Comment: Add notes or comments related to a payment.
- Process Payment: Use the payment to cover a bill/invoice.
Navigation Note
When you select the Process Payment action in the table, you will be directed to a screen that is the same as the one used for processing bills or invoices. This screen can be accessed through:
- Expenses Page: Via the Process Payment action.
- Revenue Page: Via the Process Invoice action.
The functionality on this screen remains consistent regardless of the access point.
Details on how to use the Payments page will be covered in the subsequent sections of this documentation.
Revenue Page
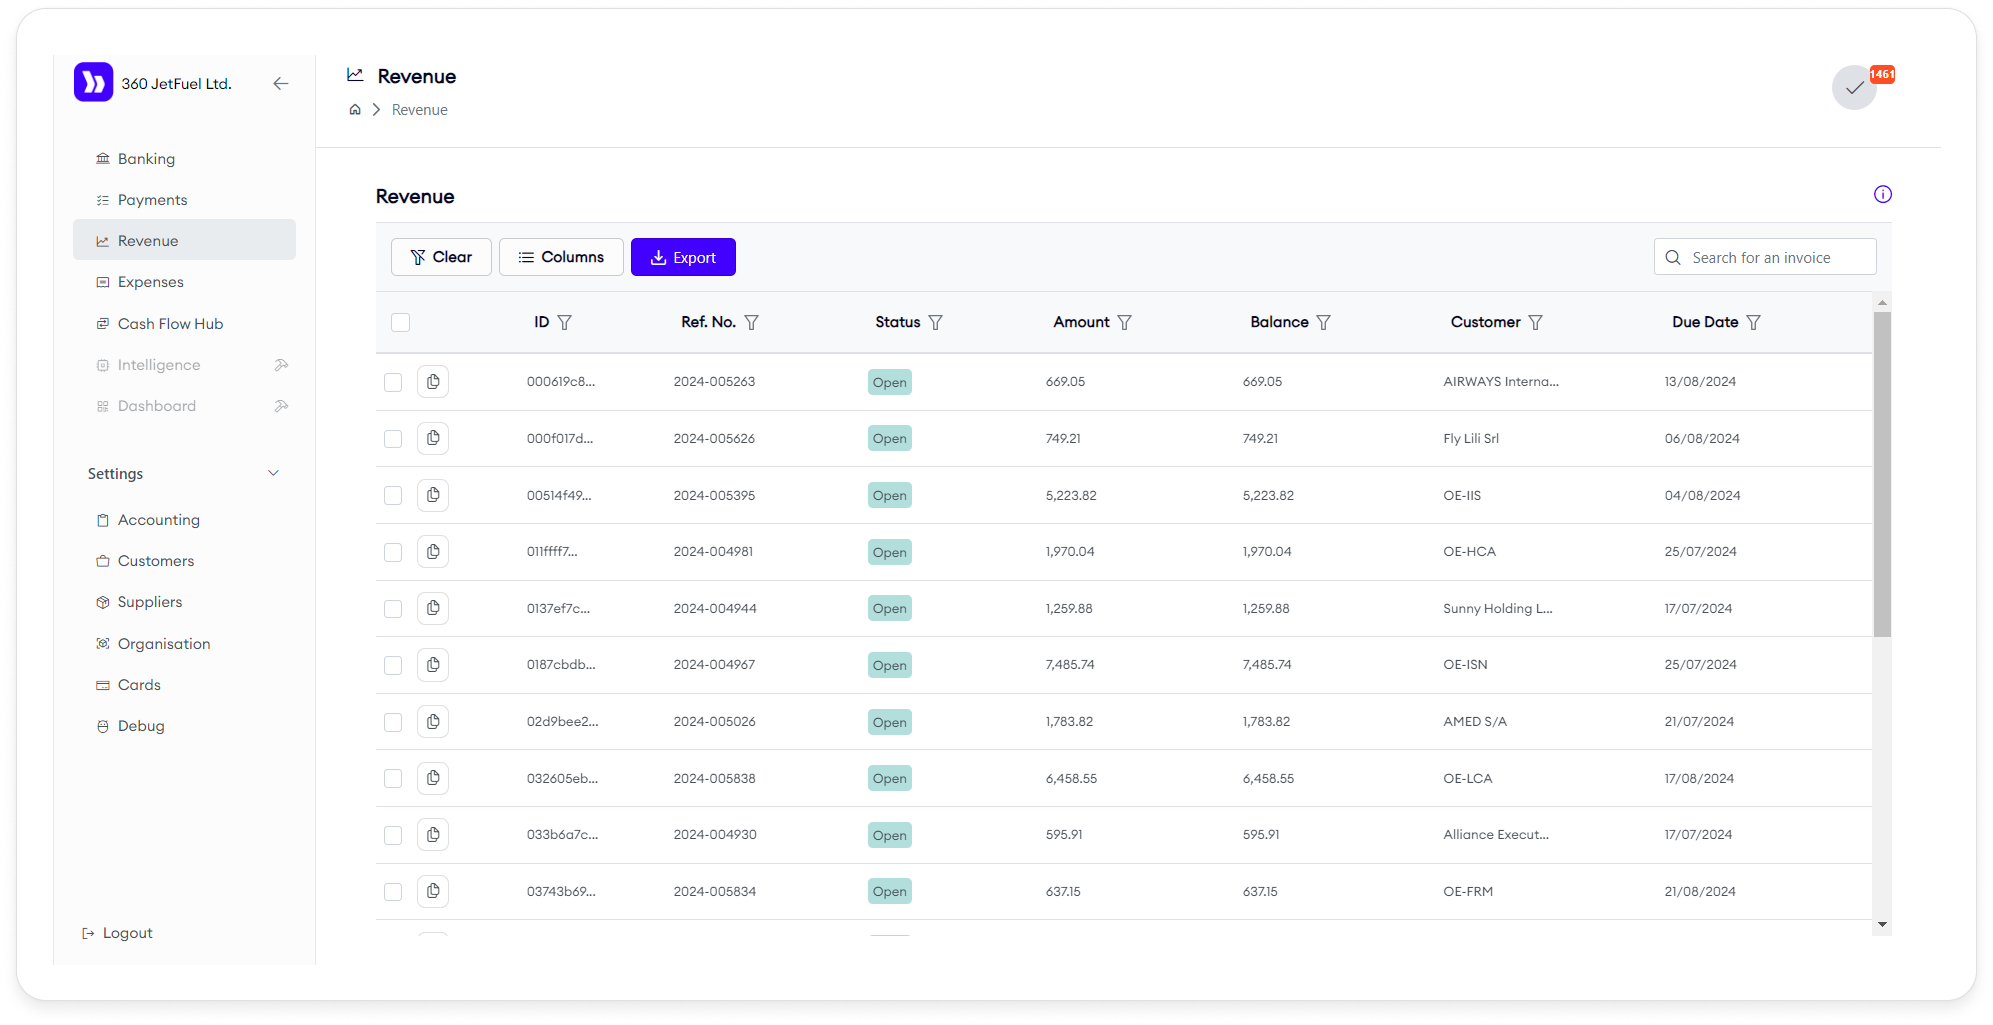
The Revenue page displays all the invoices issued by the user, organized in a table. Users can customize the table by adding new columns, rearranging them, and exporting all data.
Features
- Column Management: Add, remove, or rearrange columns in the table.
- Export: Download all invoice data.
Actions
Users can perform individual or group actions on the invoices:
- Process Invoice: Review the selected invoice(s) and link them to incoming payments.
- Send Reminder: Send a payment reminder to the customer via email.
- Add Comment: Open a sidebar to view invoice details, download data, review previous comments, add a new comment, or upload a file.
Process Invoice Workflow
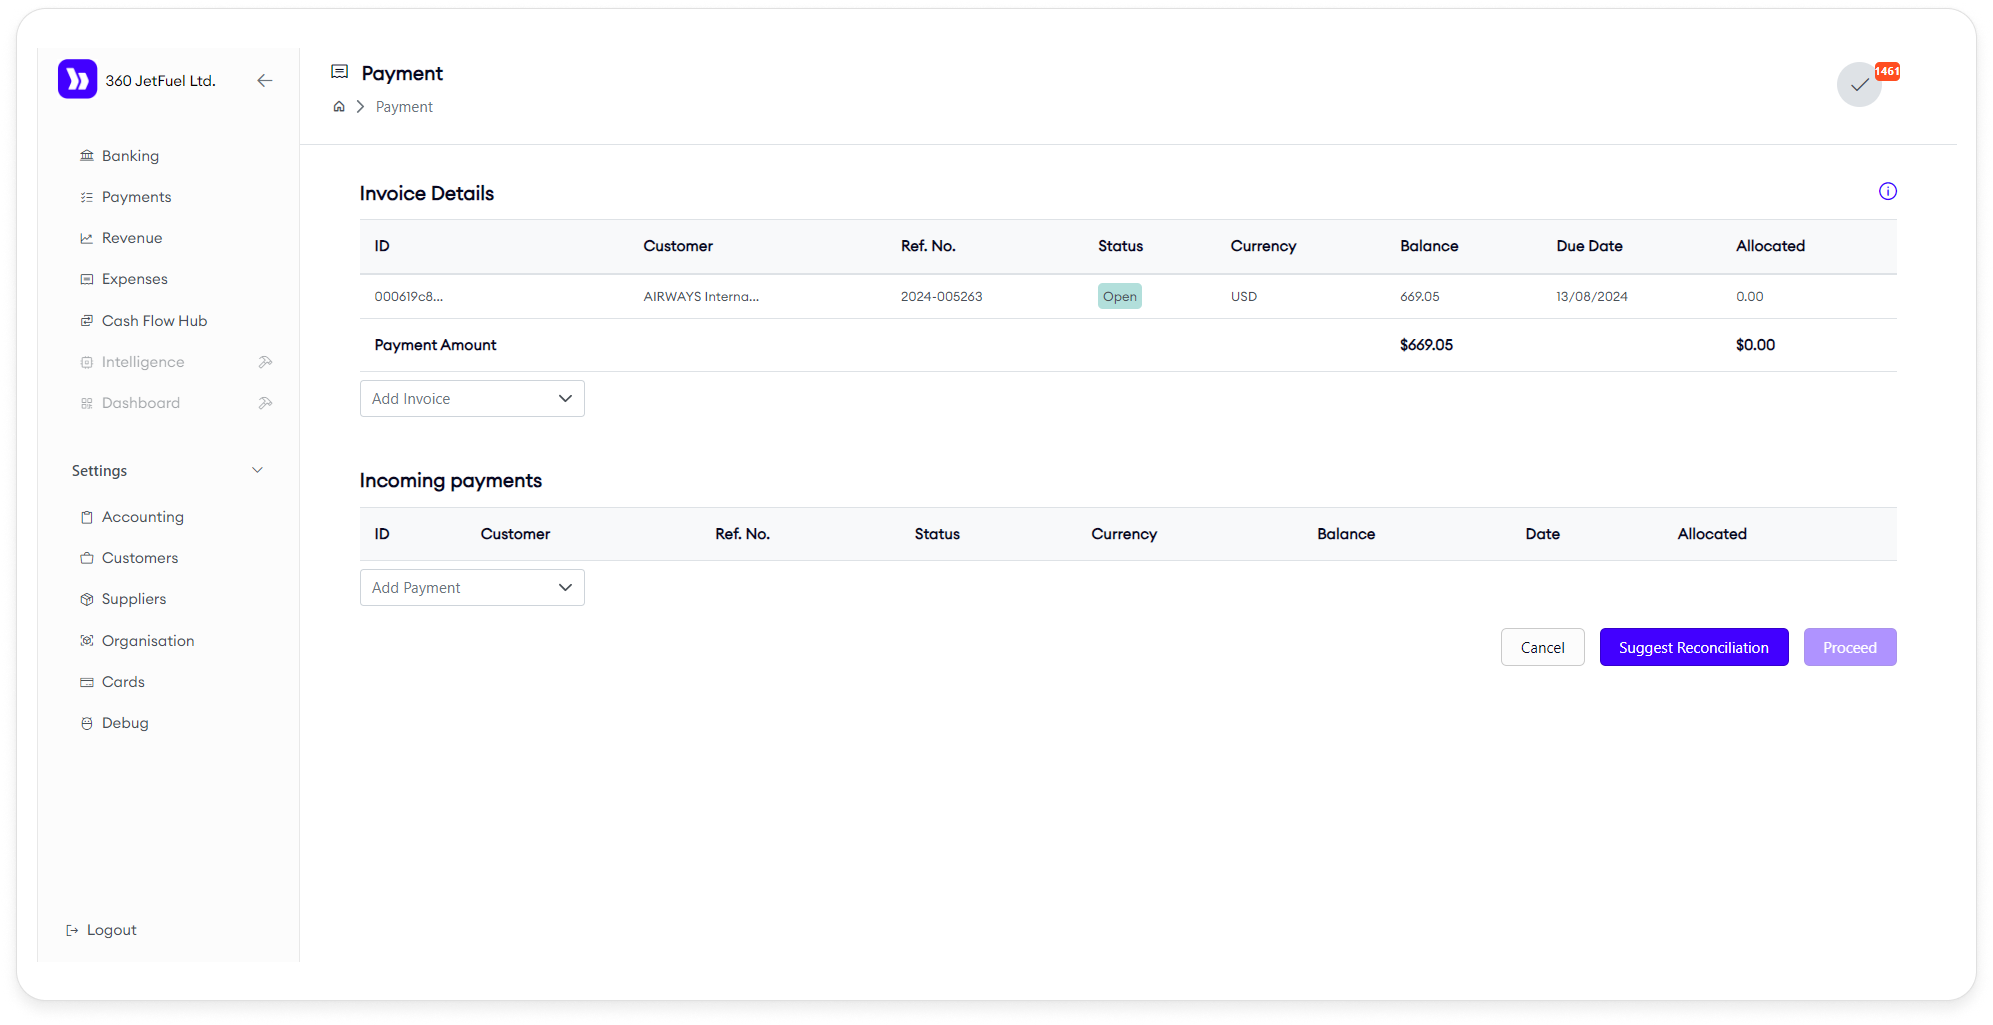
When the Process Invoice action is selected:
- Invoice Selection: View the selected invoice and its details, with the option to add new invoices.
- Incoming Payments: Link payments to the selected invoice(s).
If multiple invoices are selected, this action can only be performed if all selected invoices are in the same currency. If they are not, the user will be prompted to choose a single currency, and invoices in other currencies will be removed from the selection.
Expenses Page

The Expenses page is designed for managing and paying bills. The functionality is similar to the Revenue page, but here you manage outgoing payments for bills that need to be paid.
Features
- Column Management: Add, remove, or rearrange columns in the table.
- Export: Download all bill data.
Actions
Users can perform individual or group actions on bills:
- Process Payment: Open the payment process workflow to pay bills by selecting bank accounts. This option allows you to manage how funds are distributed across different accounts.
- Add Comment: Open a sidebar to view bill details, download data, review previous comments, add a new comment, or upload a file.
Process Payment Workflow
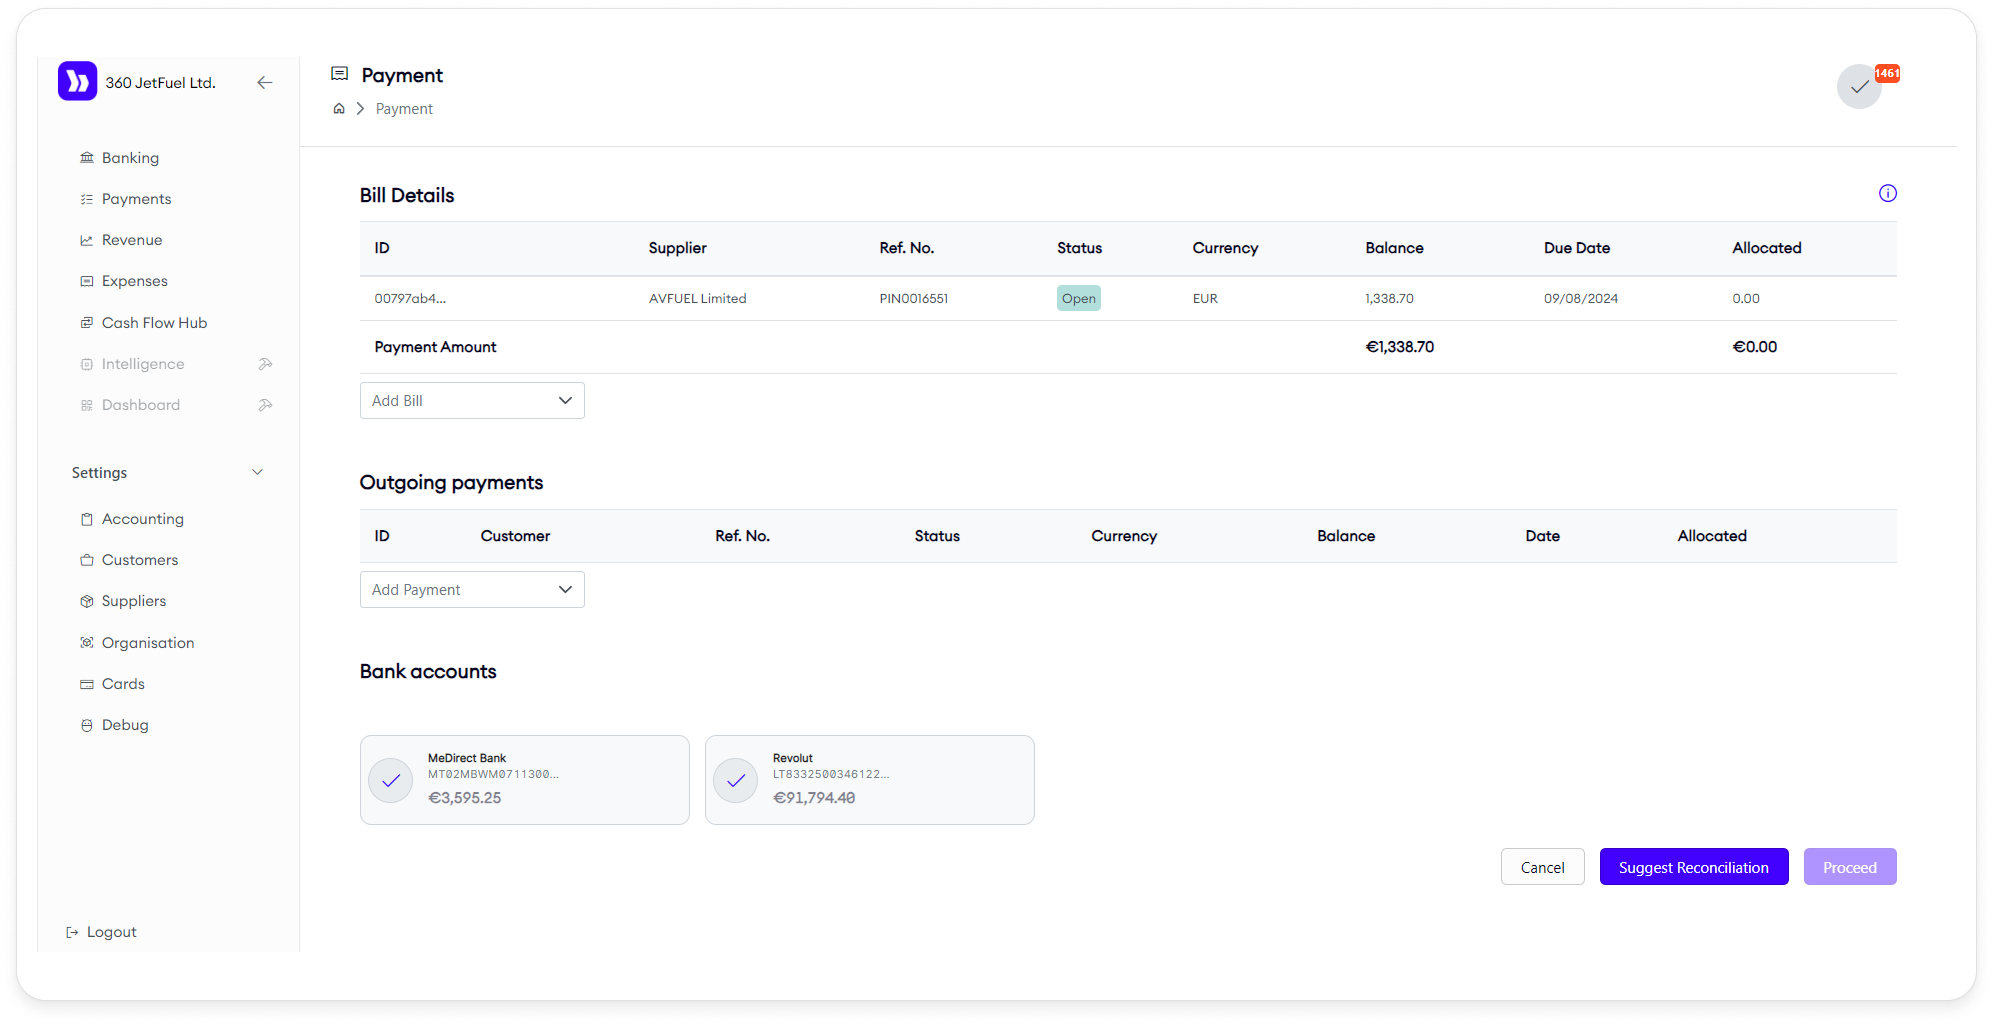
When the Process Payment action is selected:
- Bill Details: View the selected bill(s) and their details, with the option to add more bills to the payment process.
- Bank Accounts: Select bank accounts from widgets. The system will suggest how much money to allocate from each account based on an algorithm that optimizes payment distribution.
- Outgoing Payments: If a bill has already been partially paid, you can link it to the payment(s) already made, indicating that the bill is covered.
Prepayment
If you have made a prepayment (e.g., paying $2000 in advance), the system can deduct future bills from this amount (e.g., $500 monthly). After selecting this option, click Suggest to apply the prepayment, and the system will confirm the approval.
Currency Handling
You can perform these actions as group actions, but if the selected bills are in different currencies, you must choose which currency to work with. The system will then exclude bills in other currencies from the selection.
This page allows for comprehensive management of expenses, enabling efficient bill payment and tracking.
Cash Flow Hub Page
The Cash Flow Hub page is similar to the Process Payment page but with a few differences. It is divided into three main sections:
- Bank Accounts: Displays the bank accounts with their current balances at the top of the page. Users can select the bank accounts they want to use for payments.
- Chart: Visual representation of user's cash flow
- Upcoming Dues: Consists of Past Dues, Open Bills, and Credits Available.
Chart Overview
The chart visually tracks the changes in your cash balance. By default, it shows only expenses. However, you can add revenue to the chart, representing incoming funds expected on specific days. By selecting the appropriate buttons, you can toggle the display of Expenses, Revenue, and the Minimum Available Amount line on the chart.
Bank Accounts
At the top of the page, you will see your bank accounts displayed along with their current balances. Users can select one or more accounts to use when making payments.
Upcoming Dues
The Upcoming Dues section consists of three subsections:
- Past Dues: Bills that should have been paid already.
- Open Bills: Bills that are due for payment in the near future.
- Credits Available: Payments you have received, which can be used to pay certain bills.
Each subsection contains a set of cards, with each card representing a bill. Users have the option to select all bills within a subsection or pick specific ones for payment.
Filters
- Currency Filter: Switch between different currencies. The display of bills, invoices, and bank accounts is filtered based on the selected currency.
- Chart Settings: Choose to display either one or two weeks on the chart.
- Min Available Amount: A customizable line on the chart indicating your minimum desired balance.
- Supplier Selection: Filter the Cash Flow Hub to show all bills related to a specific supplier.
- Customer Selection: Filter the Cash Flow Hub to show all invoices related to a specific customer on the graph. In the future, this will also only display bills pertaining to those customers through drop-shipping
Two Payment Modes
-
Automatic Suggest Mode:
- Select a bank account, but leave items in the Upcoming Dues section unselected. Click Suggest to allow the system to recommend which dues to pay based on the optimal strategy for you. The system will match selected dues with available payments, without affecting your account balances.
-
Manual Selection Mode:
- Manually select payments and dues. After making your selections, click Suggest to get recommendations on which accounts to use for each payment. Once satisfied, you can proceed with payment.
Proceeding with Payments
When you click Proceed, the system confirms the payments to be made based on the algorithm’s suggestions. You’ll be taken to a confirmation window where you can review and approve the transactions. Payments are then processed through the bank, or you receive a CSV file with instructions for manual payments, or both (depending on what your bank supports).
Settings
The Settings section allows users to configure various aspects of the application. It is divided into several pages:
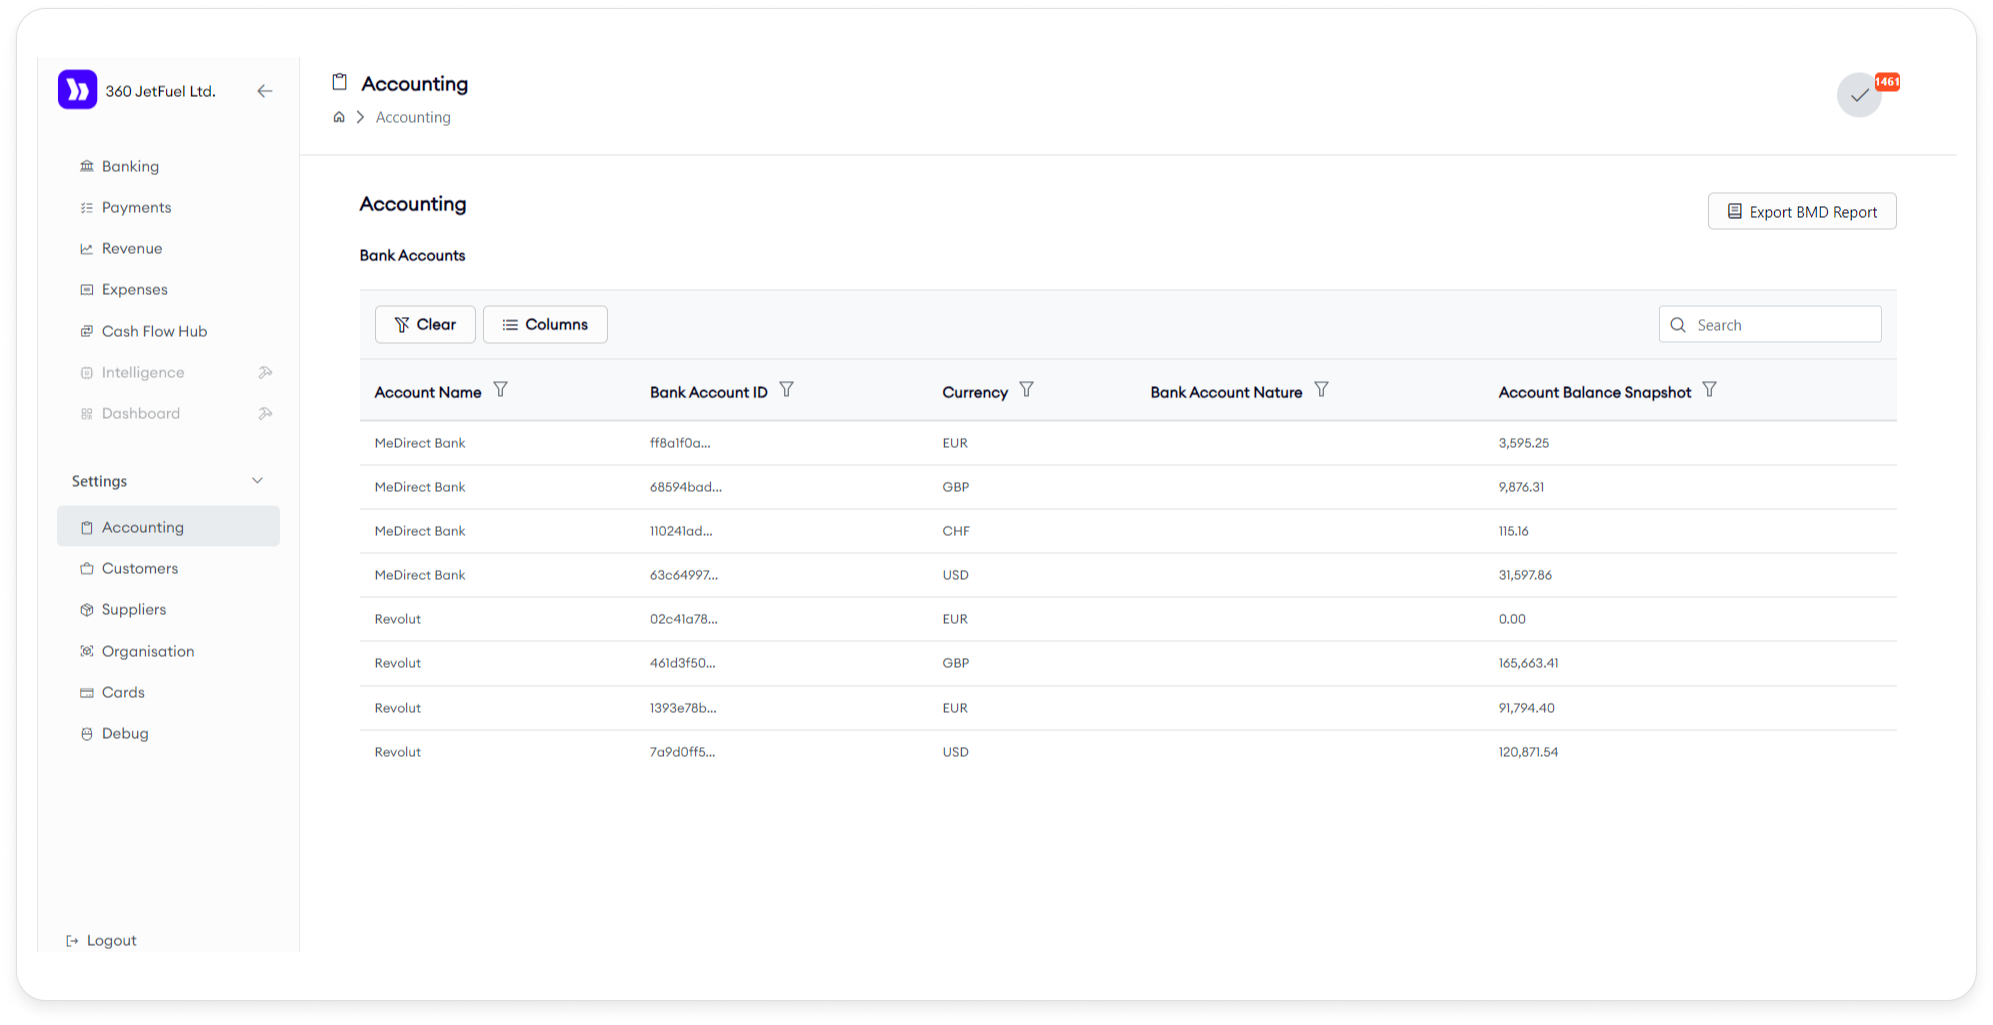
1. Accounting
- Bank Accounts Table: View and manage information about your bank accounts. Users can add or modify columns in the table.
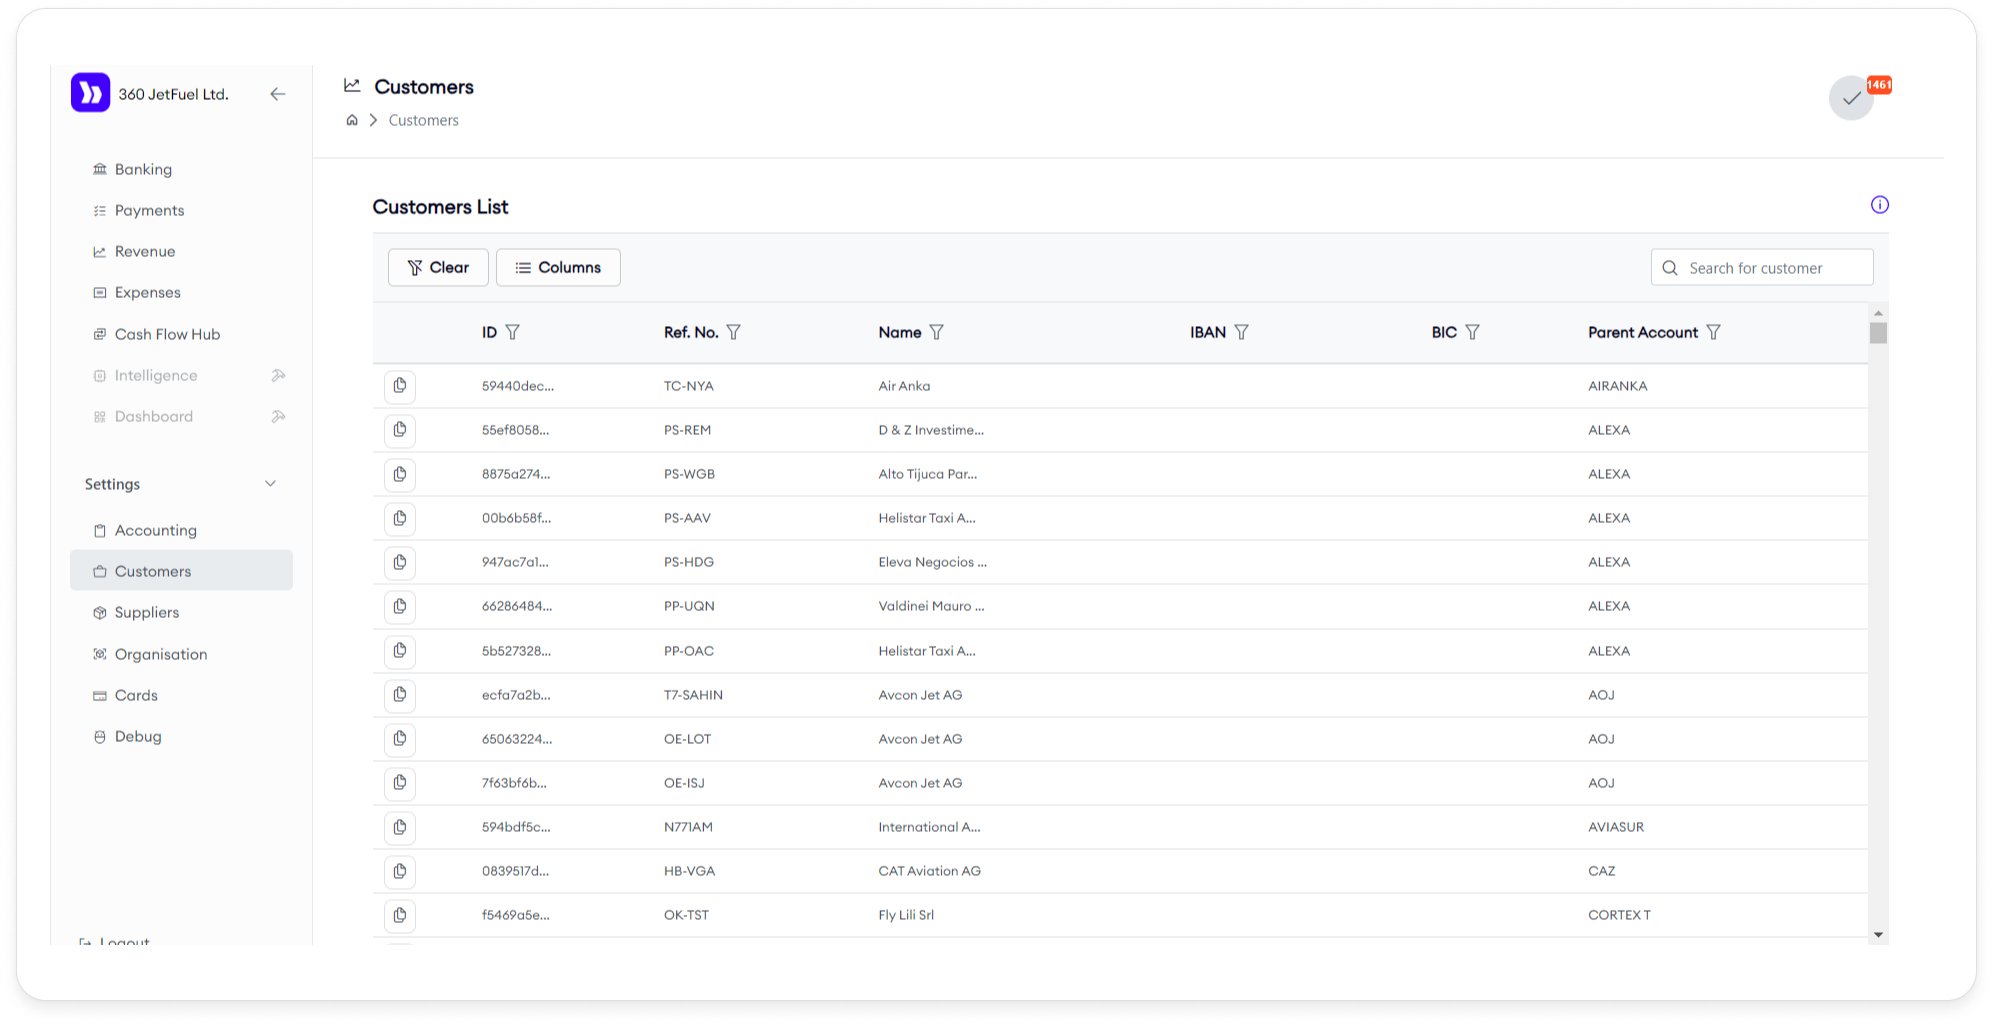
2. Customers
- Customers Page: Contains a table with information about your customers. Users can copy the ID for each row.
3. Suppliers
- Suppliers Page: Contains a table with information about your suppliers. Users can copy the ID for each row.
4. Organisations
- Payment Settings: Configure payment-related settings including:
- Currency: Set the default currency.
- Consider Paying Early By: Define early payment considerations.
- Soft Total Minimum Balance: Set a minimum balance for soft total calculations.
- Hard Account Minimum Balance: Set a minimum balance for hard accounts.
These parameters are used for the Cash Flow Hub page.
Acumatica
We have a two-way sync with data from Acumatica. We pull data from it to create and update our database, and we push changes made through Bankwards to Acumatica.
Statuses
Invoices and payments have a status indicating their current state.
The table below contains a comparison of Bankwards and relevant Acumatica statuses.
| Status | Acumatica | Bankwards |
|---|---|---|
| Open | Open to work on | Open to work on |
| Closed | Paid/used | Paid/used |
| On Hold | Waiting for user action | N/A (we don't pull On Hold entities) |
| Balanced | Waiting for user action | N/A (we don't pull Balanced entities) |
| Failed | N/A | Failed to push the invoice/payment to Acumatica |
| Draft* | N/A | Waiting for user confirmation of the payment |
| Initiated* | N/A | Payment request has been sent |
| Pending* | N/A | Waiting for confirmation of the payment |
| Unknown* | N/A | AISP transaction has a status we don't recognize |
* - Only applicable to payments
TODOs are actionable notifications within Bankwards.
A TODO is always triggered by an event within Bankwards, known as a source action, and can only be removed with a resolution action.
TODOs are always related to an entity within Bankwards (Bill, Invoice, Transaction, Payment).
| Source Entity | Source Action | Resolution Action |
|---|---|---|
| New unused transaction | Transaction enters the system from external source | Transaction is used as a payment (partially or fully) |
| New unused transaction | Transaction enters the system from external source | Transaction is marked as misc. |
| New unused transaction | Transaction enters the system from external source | Transaction is converted to a prepayment |
| Overdue Invoice | Invoice becomes overdue (past due date) | Invoice is closed/paid |
| Overdue Bill | Bill becomes overdue (past due date) | Bill is closed/paid |
| Any entity (bill, invoice, payment) | New comment is added | Thread containing comment is resolved |
| Any entity (bill, invoice, payment) | Failure to sync to acumatica | The issue is resolved manually on the Acumatica backend |
Bankwards provides several paths for paying bills:
- Payment through Saltedge
- Generating a CSV file for Revolut bulk payments
- Generating a CSV file for MeDirect bulk payments
The system will automatically choose which path to take according to the following conditions for source and destination bank accounts:
- If the source account belongs to MeDirect -> Generate a MeDirect CSV file
- If the source account belongs to Revolut, and the destination account has an iban, and it belongs to one of the SEPA countries -> Use Saltedge to create the payment
- If the source account belongs to Revolut, and the destination account doesn't belong to SEPA -> Generate a Revolut CSV file
*Note: These conditions are subject to change, pending on communications with Saltedge